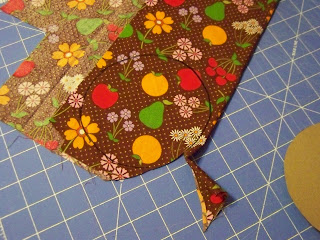
Jeni from IN COLOR ORDER Has the best pattern ever for drawstring bags. I've made several of them for gifts ~ the possibilities are endless! Just click on the link above and you'll land right on her tutorial page. Check out the rest of her blog, it's amazing! If you purchase her pattern like I did, you'll have many sizes to choose from. She has done all the math and makes it really easy. Just in time for Christmas!!!
Mini Christmas Trees from Lemon Tree Creations !!
This is not my idea so I've included the link above for you to click and view the tutorial. This is the cutest little project and looks like it can be completed in a short amount of time, providing you have the supplies on hand.
If you do make these, please leave a note on the blog, Thank you. Enjoy!
Simple String Back Pack from About.com
This is such a cute little string back-pack. The video helps make it super easy! Like the instructor mentions, it's totally great for personalization. I'm thinking we could fill the bags with goodies and then you'll have the perfect gift! Check it out.
Simple String Back-Pack {From About.com}
%%%%%%%%%%%%%%%%%%%%%%%%%%%%%%%%%%%%%%%%%%%%%%%%%%
A Little Rainbow Wrap Skirt!! from
A E S T H E T I C N E S T
Aesthetic Nest: Sewing: Rainbow Wrap Skirt (Tutorial)
This is seriously the cutest little skirt ever!! If I had a little girl, she'd be wearing it. Her instructions are very clear, pictures are awesome. You can do this!! Click on over and check it out.
%%%%%%%%%%%%%%%%%%%%%%%%%%%%%%%%%%%%%%%%%%%%%%%%%%
Yo-Yo's.......
I love Yo-Yo's. They are the best little embellishment ever. For me, they have a nostalgic feel. Like, pillow cases and their hem completely covered in Yo-Yo's! They can be doubled or tripled with or without a "gem" in the middle. Coordinating fabric or monochromatic, same size or graduating. You can add them to crafty items, or I like to add them to little girls dresses. They can spruce up a tote or an apron. My all time favorite thing is to place one over an "oopsie" . { You know, that little wrinkle or skipped stitch that you just don't want to re-do}.
I always have a large gallon ziplock baggie full of them in a variety of colors and prints. They require such a small amount of fabric, so it's perfect for using up scraps. My "pattern" is a piece of cardboard cut in many different size circles. I use a cup, mug or coaster to trace around. Use whatever you have around the house. Other supplies would be fabric, scissors, thread and needle.
Here are a few pictures to help with the process
Once the circle is cut out, thread your needle and find a starting point. Make sure your first stitch is locked in secure. Finger press a "hem" and begin with a running stitch, loading on to the needle and then pull through.
When you've sewn around the entire circle, gently pull thread all the way through to tighten the fabric and form your Yo-Yo. This is the step that you'll appreciate a secure first stitch!
And there ya go! You've got a Yo-Yo. What I do it pre-cut my circles and keep them in the baggie with a needle and spool of thread. If we're going on a road trip or waiting at a Doc appt, I can work on my Yo-Yo's. Have fun!
Until next time,


No comments:
Post a Comment
I love your comments :-)